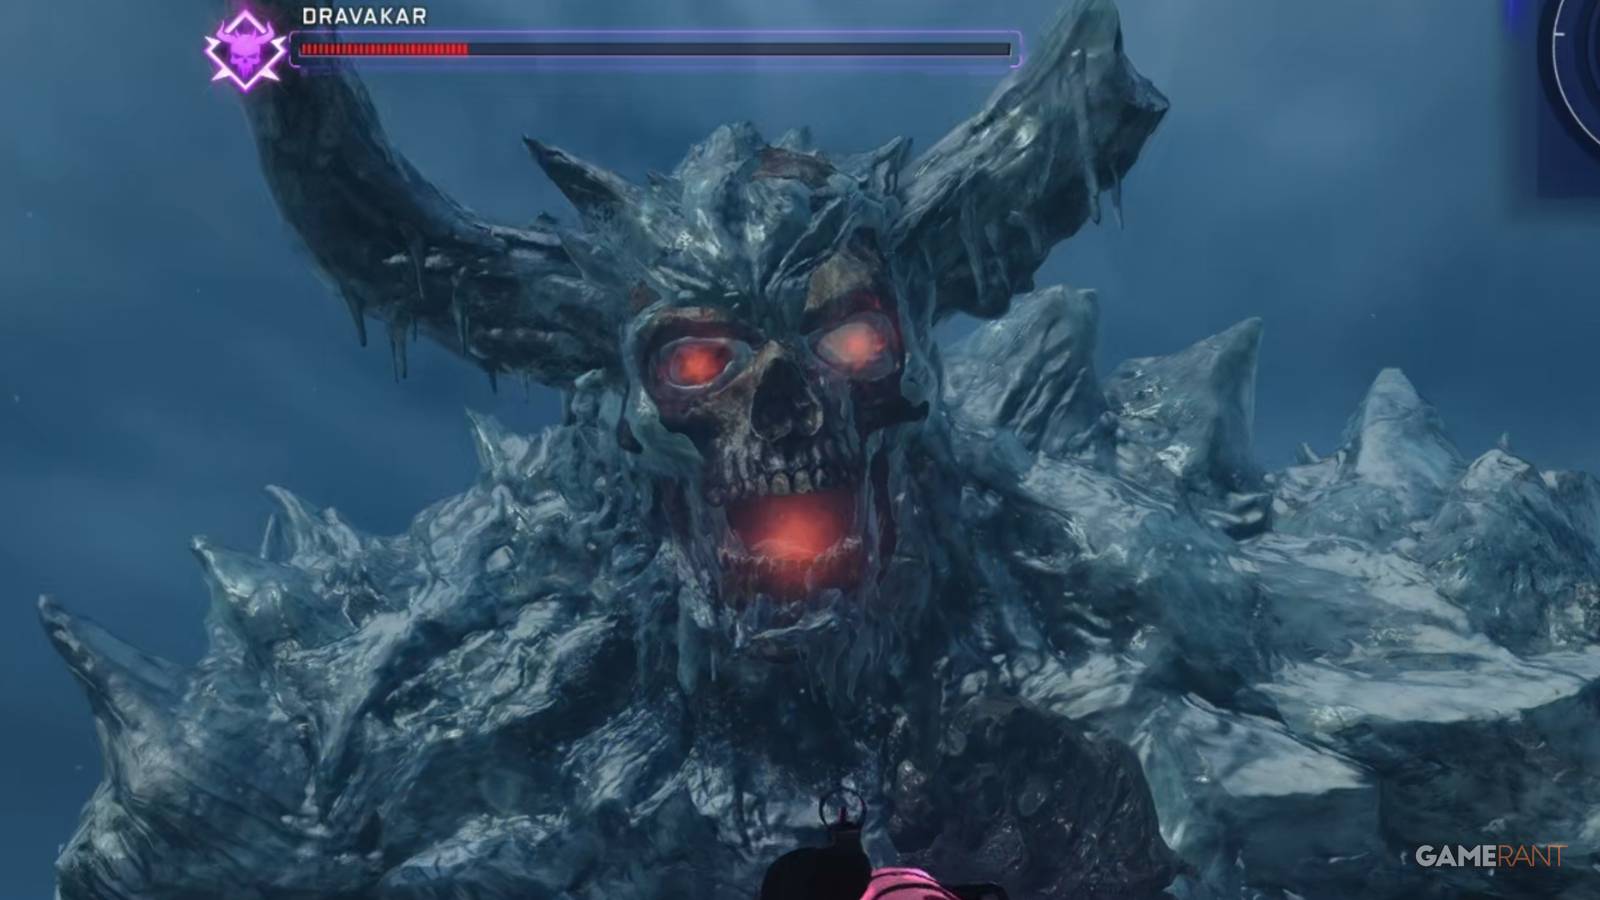
Dravakar is the final boss of Totenreich, and he’s an ice giant the size of mountains. As far as boss fights go, Dravakar is a tad more complex and has a few mechanics that make him extremely deadly and intimidating. That is, unless you know what to bring and how to beat him.
Below, we’ll share the best build for fighting Dravakar in Black Ops 7 Zombies so you can complete the Totenreich easter egg with ease. We’ve got the best weapons, Augments, GobbleGums, and a detailed boss guide so you can kill him and win.

Totenreich Easter Egg Walkthrough in Black Ops 7 Zombies
Here’s a complete guide to Totenreich’s main easter egg quest, involving all steps with added tips to ensure you complete it solo or with allies.
Best Weapons for the Totenreich Boss Fight
For Totenreich, you’re going to want three different weapons: One for clearing zombies, one for shooting the boss, and the Jotunn Star to remove the Gjallafrosts’ immune shields.
1911

- The Tier 3 Pack-a-Punch Mustang & Sally will annihilate close-quarter zombies and Gjallafrosts.
- Build Code: P07-AABQ1-5865D-11
- Napalm Burst or Shatter Blast are great Ammo Mod choices.
The 1911 is a classic, and it’s the perfect weapon to use in the Totenreich boss fight. However, you won’t want to actually use this weapon for Dravakar. Instead, the Mustang & Sally should be used against Gjallafrost, the floating head that you need to kill before Dravakar reappears.
With Mustang & Sally equipped (and with the attachments I provided in the build code), you’ll have an akimbo, fully automatic set of explosives pistols that deal absurdly serious damage to zombies and Gjallafrost. Stuck in a corner? Mustang & Sally. Need to kill Gjallafrost? Mustang & Sally.
MP40 / M34 Novaline
- The Tier 3 Pack-a-Punch MP40 / M34 Novaline is perfect for shooting Dravakar, and should be your go-to boss weapon.
- Build Code: M03-21WSP-DGAE5-Q911
- Napalm Burst or Shatter Blast are great Ammo Mod choices.
Since the MP40 is locked to the Mystery Box, you might want something more reliable, and what’s more reliable than the M34 Novaline? I’ve recommended this weapon for multiple boss fights, and Totenreich continues the trend for good reason.
You only want to pull out the M34 Novaline when all the zombies have been killed, and it’s just you and Dravakar. Hide behind a pillar and shoot Dravakar’s weak spots to enjoy the amazing damage the Novaline provides. Dravakar is at a distance, so you need something with long-range, like the Novaline, to deal damage reliably.
The reason we recommended the MP40 is that it far exceeds the damage of other Assault Rifles and Marksman Rifles, but if you can’t get it out of the Mystery Box, then don’t worry about acquiring it.
Jotunn Star

The Jotunn Star is an essential weapon for the boss fight, and you’re not beating it without it. You need to use the Jotunn Star’s charged shot (L2/LT) to fire at the Gjallafrost when its eyes turn red and its mouth opens. The Jotunn Star is the only way to stun the Gjallafrosts and remove their immune shield.
Even outside of removing the Gjallafrost immune shield, the Jotunn Star acts as a lantern that can protect you (and nearby allies) from frost damage, ensuring you never take tick damage or slow down from Dravakar’s freeze attacks.
If you have Mule Kick and want a third weapon, then the Ray Gun or Ray Gun Mark 2 are solid choices. These can help you when you’re in a tight spot, and the damage is great to help your team shoot the boss when you go down and need to be revived.
Best Field Upgrade & Equipment for the Totenreich Boss Fight
Frenzied Guard

- Frenzied Guard will repair your armor; all damage you take is mitigated by your armor, and kills restore more armor.
- Frenzy Fire as your Major Augment and use Dual Layer | Extension as your Minor Augments.
There’s no point in using Aether Shroud for this boss fight, as too many area-of-effect abilities will ensure your demise. As such, armor is the greatest resource in Totenreich’s boss arena, so Frenzied Guard becomes essential.
If you’re out of armor and on the verge of death, use Frenzied Guard to regain all 3 armor slots, and enjoy the extended time thanks to Extension, the extra damage mitigation from Dual Layer to feel invincible, and the infinite ammo (provided you have stock ammo) from Frenzy Fire.
LT53 Kazimir

The only equipment you should bring is the LT53 Kazimir. Max Ammo will be rare in the boss arena, and the LT53 Kazimir can be used sparingly during zombie phases to distract zombies while you focus fire on Gjallafrost. It’s also great for the starting phase against Dravakar when he’s fighting the giant robot.
There’s no reason to use a Scorestreak here, as they’re all too slow to do anything significant against the boss, but the Disciple Injection might be nice to give yourself breathing room, and the Death Machine is good for minor damage against the boss.
Best GobbleGums for the Totenreich Boss Fight

You can only take three GobbleGums with you in the boss fight, and these are the ones we’d recommend for solo and co-op players alike:
|
GobbleGum |
Why It’s Useful |
|---|---|
|
Shields Up |
Refills armor and makes it twice as strong, perfect for if and when you run out of plates. |
|
Power Keg |
Grants Full Power, meaning you have another use of Frenzied Guard when you run out, which means more armor. |
|
Aftertaste (solo) Phoenix Up (co-op) |
You can keep all your Perks when you revive yourself in solo. You can instantly revive your downed allies in co-op, and they will have their Perks. |
Best Perks & Augments for the Totenreich Boss Fight
You should aim to have every Perk before going into the Totenreich boss fight, but we’ll list off some absolute must-haves, the Augments that make them even better, and the why:
|
Perk |
Augments |
Why It’s Useful |
|---|---|---|
|
Jugger-Nog |
Iron Core Durable Plates Hardened Plates |
All these Augments will ensure you either have the health to withstand attacks without armor, or the damage durability to keep your armor alive for longer. |
|
Quick Revive |
Equivalent Exchange Slow Death Karmic Return |
Revive yourself with all your perks if you deal enough damage. (3 times) Give yourself more time to deal damage, or wait for an ally to revive you. Revive allies to instantly heal to stay in the fight. |
|
Melee Macchiato |
Expresso Stick ‘N Move Barista Brawl |
With Jotunn Star being a melee weapon, you will want to deal more damage, attack faster, and move more quickly. |
|
Speed Cola |
Classic Formula Fast Pitcher Quick Swap |
The enemy variety will make you want to switch weapons faster (from Jotunn Star to Mustang & Sally) and reload faster when it’s time to damage the boss. |
|
Double Tap |
Double Impact Double Caliber Double Time |
Bullet weapons will shoot faster, have more penetration, and deal bonus damage if they hit the same target, which increases your DPS against the boss greatly when he’s the only target. |
|
Deadshot Daiquiri |
Dead Head Dead Break Dead Heat |
Increase critical damage and bullet damage against armor pieces to further melt the boss. Dead Heat increases movement speed with point-blank kills, which is great for when you’re overrun by zombies. |
PhD Flopper is also a must if you’re using Mustang & Sally, but we haven’t added Augments here as none give you an edge against the boss. As we stated above, try to get all perks if you can before the boss!
How to Beat the Totenreich Boss Fight in Black Ops 7 Zombies
Dravakar Part #1

- When you spawn into the boss fight, Dravakar and the giant robot will be engaged in a fight. Your objective here is to avoid swarming zombies and shoot Dravakar’s glowing red weak spots when the giant robot is grabbing him.
- If you do not break the weak spots in time, Dravakar will make the giant robot retreat temporarily, so just wait for him to come back.
- We recommend using your Kazimirs for this phase.
- This phase will end once Dravakar has lost a fourth of his health bar.
Drakavar Part #2
- When Dravakar becomes immune, he will leave the boss area and leave Gjallafrost to take his place, which is a floating ice head.
- The objective here is to acquire the Charged Shot with Jotunn Star (attack enemies until the lantern glows) and throw a Charged Shot into the Gjallafrost’s mouth when his eyes glow red.
- This will remove Gjallafrost’s immune shield, and you can then switch to Mustang & Sally to destroy him, and repeat until it dies.
You can activate the traps in the boss arena to get unlimited Charged Shots without killing zombies. When Gjallafrost dies, he will always drop more Armor Plates, so make sure you pick those up.
Drakavar Part #3

- With Gjallafrost dead, Drakavar will return to the boss arena, so make sure you kill all the zombies as they won’t respawn during this part.
- Drakavar will shut down either the left, right, or middle area of the map with a blizzard, indicated by the red radius on the minimap and in view. Avoid the blizzard areas, or have someone on your team hold out Jotunn Star to keep the area warm.
- You will want to always hide behind the pillars during this phase so you’re not hit by Drakavar’s attacks, as he will hurl endless rock barrages at you.
- This phase is easy, so long as you hide behind a pillar and focus on Dravakar’s glowing red weak spots with your Assault Rifle/Marksman Rifle.
- This phase ends once Drakavar reaches half health.
If you need ammo, run to the middle of the arena and purchase it from the Ammo Crate!
Drakavar Part #4
- Drakavar will leave again, and he will spawn two more Gjallafrosts on opposite sides of the arena.
- Just like before, use the Charged Shot from Jotunn Star to break their immunity, and destroy them with Mustang & Sally. Focus on one head at a time, and throw an LT53 Kazimir if you have any to give yourself room to fight them.
- Once both Gjallafrosts are dead, Drakavar will return.
Drakavar Part #5

- When Drakavar returns, you just need to play the same as you did before.
- Hide behind pillars, avoid areas covered in a deadly blizzard, and shoot his weak spots.
- That is, until he has a quarter of his health bar left, and he begins the final part of his fight.
Drakavar Part #6
- When Drakavar has a fourth of his health bar left, he will throw you into the middle of the arena and block the exits, forcing you to stay here until you kill him.
- Dravakar’s weak spot is now his head, so you will need to aim for his head while avoiding his rock attacks.
- Watch for Drakavar’s attacks and make sure you’re dodging left to right, or in some cases, by going prone.
- This is the perfect opportunity to use Field Upgrades and GobbleGums if you need to, but his attacks are relatively easy to dodge if your reflexes are fast enough (you can watch the video above as an example).
- Once Drakavar’s health is depleted, he will wind up his fist to punch you, but will be stopped by the giant robot, which will then end the boss fight and the easter egg.

- Released
-
November 14, 2025
- ESRB
-
Mature 17+ / Blood and Gore, Intense Violence, Strong Language, Suggestive Themes, Use of Drugs
