
There are a few remote locations in The Legend of Zelda: Echoes of Wisdom which Zelda can access early on, but can't actually access until certain conditions are met. Although you can find the mysterious shipwreck south of Seesyde Village before taking on this side quest, you can't actually enter it until you start The Zappy Shipwreck.
Although you can pick up this quest relatively early Echo of wisdomZappy Shipwreck is much easier to complete once you've added some powerful battle echoes to your collection, and once you've created some Electricity Proof potions or smoothies. This is because the monster causing Zappy Shipwreck's problems is a Barinade, a giant electric jellyfish that is hard to beat without some echoes or an upgraded Swordfighter form.
Echoes of Wisdom The Zappy Shipwreck Quest Location
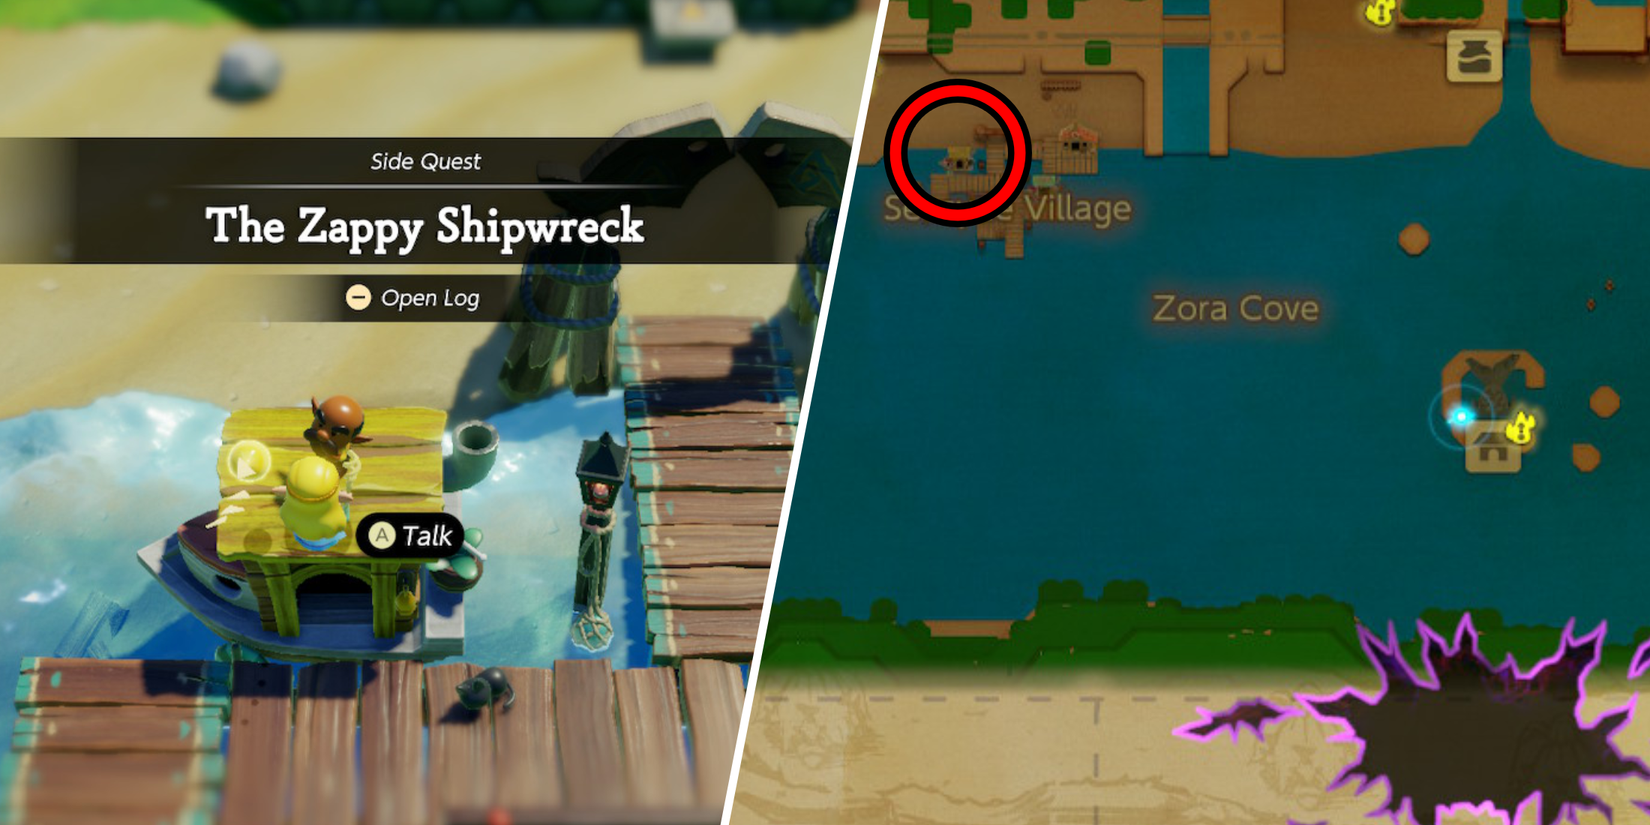
To start The Zappy Shipwreck quest Echo of wisdom, go to Seesyde Village and look for an old man standing on top of a boatright next to the bridge entrance. Use an Echo to jump on top of the boat, then talk to him to find out his predicament.
Turns out the man needs some Zippy to deal with a Zappy monster currently living in a shipwreck to the south. Reply with “I'm Zippy!” to his dialogue, then head southwest to find the shipwreck and find out exactly what's going on underneath.
Walkthrough for Zappy Shipwreck Quest
Find the ship's location and dig inside to fight a jellyfish boss
From Seesyde Village, go exactly southwest to find the shipwreck floating out on open water. Use a trampoline or other floating Echo to get onto the ship's deck. Tie to the hatch on the upper right side of the ship and pull it back to reveal an entrance into the ship's interior.
This first room is completely filled with boxes, pots and dishes, and at first glance it doesn't seem like anything to notice. But move a few squares at the top right of the room to reveal a door which leads further down into one of the flooded areas of the ship.
This room is filled with Tectites and Octoroks, but you don't have to defeat them to move on. Go to the far left of the room to see an entrance down. Enter this room, Then dive underwater in the hole on the left side to reach a side-scrolling underwater section.
Swim left through this area, stopping for bubbles and to light crystals along the way. You don't need to defeat enemies in this area to progress (unless you've collected Shocking Jelly and Tangle Echoes) and eventually you should reach an area you can surface on the upper left side of this section.
Surface to find yourself in the ship's sleeping quarters. On the left side of the room, use the Water Blocks (or another echo that can raise you up) to enter the small gap in the wooden wall in the upper left of the room.
In the next room, on the other side of a gate, you'll see a statue on the upper right side and a button on the upper left side on top of a small wall. Jump into the water and lock onto the statue while standing on its right side. Jump onto the platform next to the gate to lift it into the air and jump to the left to get it onto the short wall with the button. Lock it and pull it over to activate the button and open the gate.
You can also use water blocks to swim up while tying yourself to the statue to reach the switch more easily. Build up Water block on opposite side of the gate from the buttonthen swim it up while tethering to the statue to lift it up and place it on the button.
In the next room, either defeat or run past the enemies as you go to the rightthen enter the stairs at the top right of the room to fight Zappy Shipwreck Boss: The Barinaden.
Echoes of Wisdom Jellyfish Boss Walkthrough
The Barinade boss is thus a multi-part boss fight significantly easier with two drinks or smoothies on hand: one to power you up and one to restore your energy for Swordfighter Form.
After entering the boss room, you will see the giant jellyfish boss surrounded by five smaller jellyfish. At regular intervals the boss will charge the alien jellyfish to deal electrical damage to everything that concerns them. But not all light up at the same time, so pay attention to the boss's pattern and attack only non-electrified jellyfish until only the big one remains.
When all extra jellyfish are dead, activate Swordfighter Form and damage the Barinade boss instantly. Depending on your Sword upgrade level, it may only take a few hits to advance to the next phase.
You can also use the Ball-and-Chain Trooper to deal a lot of damage quickly with its strike, but this Echo will be quickly killed by Electric Jellyfish when they spawn.
Watch out for the boss's recovery animation and escape when it charges electricity and summons more small jellyfishin total eight this time. Follow the same strategy as before, then grab an electro-safe smoothie or drink attack the jellyfish that are not electrified one by one until all are defeated. Activate Swordfighter Form again, grab another Electricity Proof Smoothie or Potion and slash at the Barinade boss when exposed.
The barina is coming keep summoning more small jellyfish to his side if the boss fight continues, but it won't exceed eight at once. If your Swordfighter Form level is high enough, you only need to expose and slash at the Barinaden twice, but most players will find it takes three or even four phases to defeat this surprisingly tough boss.
The Zappy Shipwreck Quest reward

When you finally defeat the Barinade boss, it will drop a bunch of Rupees as well as one Heart piece. Pick up this Heart Piece and then fast travel back to Seesyde Village to complete the Zappy Shipwreck quest. Talk to the old man again and he will do it reward Zelda with a Fairy Bottle.
Fairy Bottles work a little differently than before Zelda game. IN Echo of wisdomFairies will automatically jump into any empty bottles you have. If Zelda's Hearts reach 0, a Fairy will automatically activate and refill her heart meter.
