One of the worst people in the Timekeeper’s sinister army is Vile Lector, and he’s arguably one of the worst in all of Borderlands 4. He spends his time experimenting and torturing the Augers and anyone else he can get his hands on, despite the Timekeeper’s orders, and he might be up to even worse.
No matter what he’s done, though, Vile Lector needs to see the light at the end of the tunnel. The Augers deserve justice for the crimes against them by Vile Lector; the Terminus Range must be free of his influence, and he had a bolt you need if you want to take down the Timekeeper himself.
How To Start His Vile Sanctum

His Vile Sanctum begins right after you complete the prior main mission, Dark Subject, and you can go straight to the upper part of the main road just past The Vestal Garrison Point of Interest to progress the quest.
Meet Amara in front of the bridge, then fight across it with her and Hermes’ help. You’ll have two new Order enemies to fight: the Thunderhead and a special one, Lector’s Fist.
Thunderheads are another variant of the Bulkhead that packs a powerful gun mounted on its head in addition to the same ground slams, and Lector’s Fists are mini versions of the Eridium Mining Drones from Crystal Brawl, except these charge and try to explode on you for big damage.

At the end of the bridge, you’ll have a mini boss, Orbulus. He’s essentially a stronger version of a Badass Watchman and has an Ordonite Shield. You’ll need to shoot the glowing parts on him to spawn the Vile Ordonite, then destroy the three orbs that spawn so you can break his shield.
Once he’s dead, return to Belton’s Bore and speak with Defiant Calder and the council members. Watch the cutscene, then it’s time to find the power substation in the northwest.
How To Infiltrate Vile Lector’s Fortress

From the Snowy Wells Safehouse in the northwestern area of the Terminus Range, head north on the road until you reach the river, then go east along it, past the Wildhorn and their stronger variants, until you find an icy lake.
Turn south, curve up the pathway, and use the grapples to reach Substation Canonary above. Fight the few Witnesses and Lector’s Fists on the bridge, then stock up at the Vending Machines nearby, and go inside.
Take down the Order enemies in the first few rooms until you reach a large computer room, where you’ll have your first significant fight against a horde of enemies, including at least one Badass and a Clarion Witness.
Approach the door with the forcefield to get a call, then clear out the enemies that spawn, and approach the wall on the right side of the room to get some help from Defiant Calder.

Head further inside with your new pal, Bruce, and keep breaking through the Phase barriers with him. In the largest room, there will be a massive Phase machine you need to destroy with Bruce’s help.
Follow Bruce around the room as you take out the Order enemies. He’ll go to each Limiter and knock the barrier off of it, allowing you to destroy the core, and he’ll start on the right side of the room with Limiter A, then go to the left side for Limiter B, and finally, Limiter C at the top of the room.
Each one destroyed will cause more enemies to Spawn, including at least one Badass, and you’ll see the return of the tougher Judge variant of the Warden. For the final Limiter, you’ll need to escort Bruce to it and ensure the majority of the enemies are killed before he breaks the barrier.

Stay inside Bruce’s shield bubble after Limiter C is destroyed, and you’ll be teleported into a cave. Fight off the Creeps, then grapple into the Rift at the end of the cavern to teleport again.
Fight past some more Creeps, jump up the ledges, and grapple into the next rift. This time, you’ll be in a room full of Order enemies to kill, and there’ll be one more rift to grapple into.
You’ll finally be in Vile Lector’s fortress now, and up the stairs, you’ll find two Vending Machines to restock at. When you’re ready for the next big fight, head into the courtyard.
There’s going to be a ton of enemies to fight, along with several Phase barriers to break down. Fight through to Bruce’s corpse on the other side of the courtyard and grab his Core, then head up the stairs to a room on the right.
You’ll find the engineering bay up the stairs and around the corner, then you can put Bruce’s core into the console to unlock the Bruce Bomb.

You can use a Bruce Bomb to blow the Phase barrier off a White Chest just outside the barrier that gives you a shortcut back outside.
Go back to the courtyard and use the newly spawned Bruce Bombs by the Phase-powered machines on the left and right sides of the room to blow the barriers up and expose the locking mechanisms for you to shoot.
Interact with the Umbral Foundry door to head to the next area, prep at the Vending Machines again if needed, and use the Bruce Bomb to destroy the barrier and head deeper into the facility.
How To Destroy The Eridium Relics

Keep fighting through the rooms of Order enemies until you reach a darkly lit room with a second Phase Barrier. Once the enemies are dead, go to the left side of the room with the lit hallway and rip the door off a vent with your Grapple.
Crawl through the vent to the blocked room, interact with the keypad to unlock the door, then grab the Bruce Bomb and destroy the next Phase Barrier with it.
Use the console by the wall to start the elevator, then proceed to a giant room with Amara and Hermes. Kill the Order enemies as you Grapple up to the center platform, then jump across to a platform on the upper right, and climb the ladder past the broken catwalk to reach the Bruce Bombs.

Use the Bruce Bombs to destroy the closest two Eridium Relics, then carry one to the central platform and throw it from there to the third, so you don’t have to go back and forth for bombs, then shoot the Eridium Relics to destroy them.
Now you’ll have two mini-bosses on the central Platform, both with Ordonite Shields. Shoot the glowing areas to release the Vile Ordonite like usual, then destroy those orbs to break the shields and let you do damage to the Vile Twins.
Other than the Ordonite Shields, the Vile Twins are essentially extra-strong Badass Oppression and Domination Engines, and once they’re dead, you can follow Amara across the gap and further into the facility. Take the elevator down and watch the cutscene, then prep at the Vending Machines. When you’re ready, it’s time to kill Vile Lector.
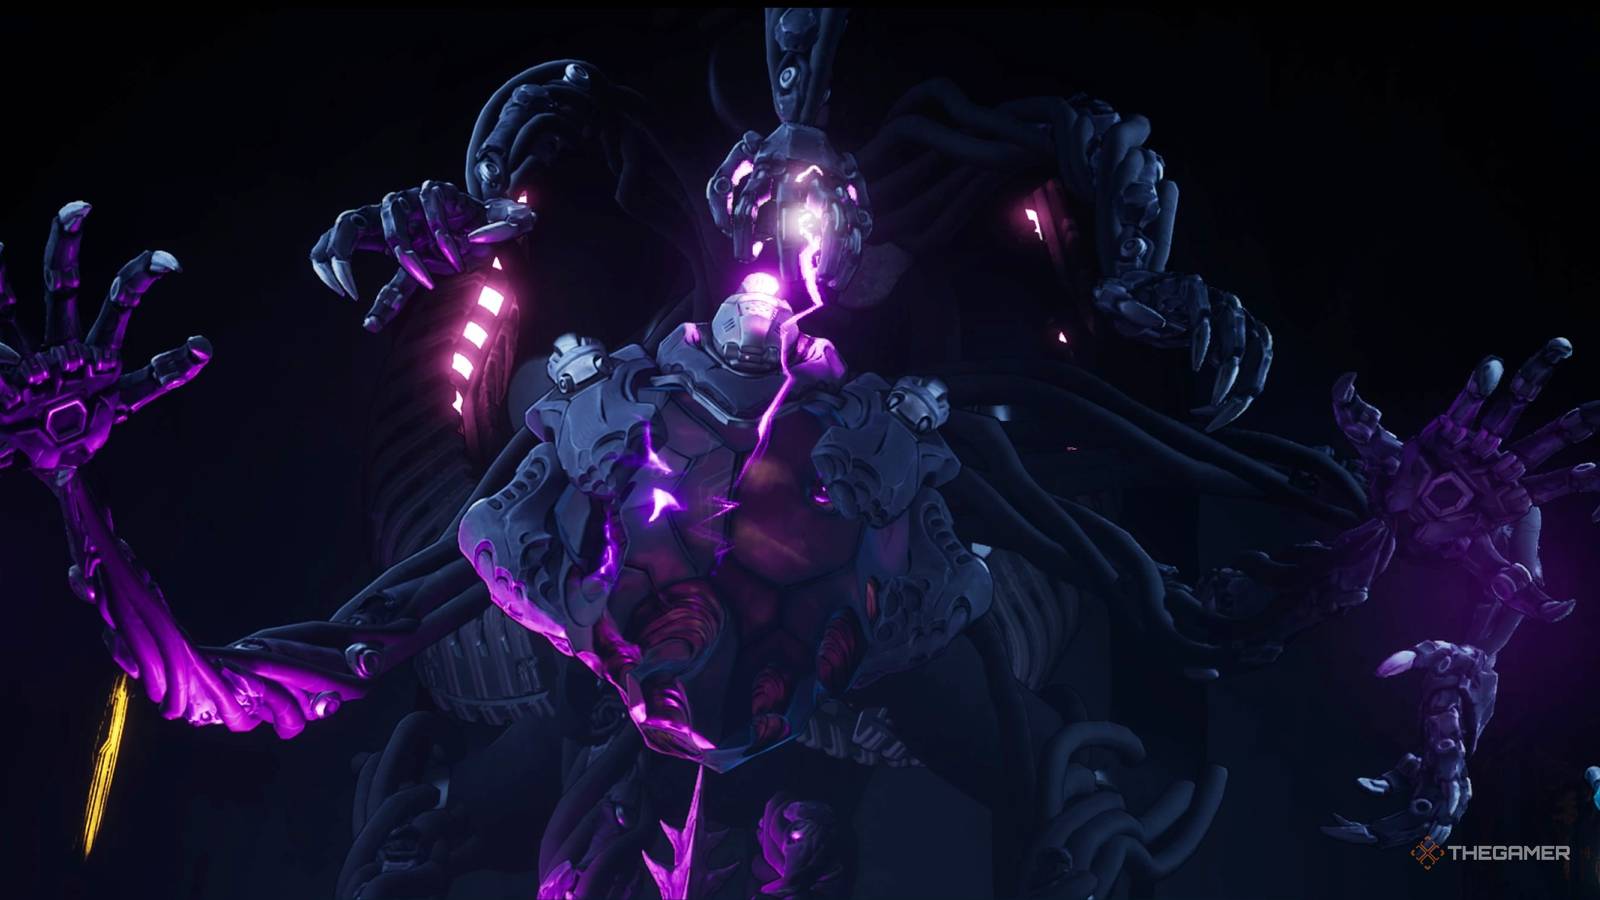
How To Beat Vile Lector

Vile Lector is a massive boss, and he has some unusual mechanics to deal with. Besides summoning Lector’s Fists to explode on you regularly, you’ll also need to take down the limbs surrounding him while dodging his unique, arena-wide attacks.
- Vile Lector spawns two waves of short, blue walls you need to jump over.
- Vile Lector spawns three sets of large, purple walls you need to weave between.
- Vile Lector’s arms fire at you with projectile fists. Phase One only.
His second phase adds several new attacks in addition to the prior ones:
- Vile Lector spawns a mix of blue and purple walls and fires them quickly.
- Vile Lector swerves and summons three, quick-firing purple walls as he moves.
- Vile Lector’s arms surround him, and he fires a long volley of projectile arms that home in.
- Vile Lector spawns several short blue walls that move in a fast, V-shaped pattern.
- Vile Lector moves to the center of the arena and charges up an arena-wide explosion, causing massive damage. Only uses it once he reaches 75 percent health.
Heavy Ordnance weapons, such as the Blastpipe series, do immense damage to Vile Lector’s core and are more consistent to use than any type of grenade, even ones that home in or instantly explode.
Start by firing at Vile Lector’s four arms while dodging his arena-wide attacks and killing the Lector’s Fist enemies. There are two on each side of his main body, and every time you kill one, Vile Lector’s glowing purple core will be exposed further, and you can shoot it to do damage.

He’ll generally alternate between the two arena-wide attacks while the arms fire projectiles at you, but your main focus should be the arms. They’ll keep respawning after several seconds, but the core will only become protected again if all four arms return.
When Vile Lector’s Shield Bar is destroyed, you’ll enter phase two and be transported to another arena. Now you can continuously do damage to him, but he’ll have a new set of attacks for you to deal with in addition to mixing the blue and purple walls.
The Glide Pack upgrades obtained from defeating Primordial Guardian Inceptus and Origo can help a ton in this fight, as they boost your Glide Pack’s stamina amount and recovery rate, respectively, making it a bit easier to dodge the walls consistently.
Lector’s Fists will still spawn during this phase, but much less frequently, and are really just there for extra damage or for Second Wind if you get knocked down. Keep damaging him as you dodge the walls until he reaches 75 percent health, where he’ll bring out his final new attack.

Vile Lector will pause in the center of the arena as he charges up an explosion, and several platforms will spawn around the arena. Grapple onto them before the explosion goes off to avoid damage, then jump back to the arena when it’s finished.
Continue with the same strategy as before, and grapple onto the platforms whenever he does the bomb attack two more times when he reaches around 50 percent and 25 health until he’s killed.
Grab your loot from him and pick up Vile Lector’s Bolt key item to trigger a cutscene, and then you’ll be returned to reality, conveniently right in front of a Boss Chest. Open your map and teleport to the Fast Travel Station at the end of the section, then exit through the door to get back to Kairos and fast travel to Belton’s Bore.
Speak to Defiant Calder to get one more cutscene, and you’ll complete the mission, earning you a reward consisting of a massive amount of EXP, some Cash and Eridium, a Rare or Epic Rarity Sniper Rifle, the Armored Collection Head for your Vault Hunter, and the Carapacer Vehicle.
